Sunday, April 6, 2014
Golden Birthday
After a few days off enjoying our limited sunshine outside, I'm back on this rainy Sunday with another gold card. I stayed with the vanilla & gold color scheme but this time I used the Another Great Year stamp. I love this stamp set because it's big and can take up the whole front of the card with very little embellishment. In fact, this time I hardly used anything - no paper piecing or faniciness whatsoever, except for that gorgeous gold embossing powder, the super-easy and fun to use washi tape and some gold brads. I may be a little biased, but I've used a lot of embossing powders over the years and Stampin' Up's are simply the best I've used (but then I think that about all of their stuff :-))
I'm trying to build up a new stash of cards to give out so I don't feel pressured to make a card every time a birthday or big event comes up - this is another good one to put in that stash!
Card Supplies: (All supplies from Stampin' Up unless otherwise noted)
Stamps: Another Great Year
Cardstock: Very vanilla, Gold foil sheet
Ink: Versamark
Other Stuff: Gold EP, Watercolor wonder washi tape, gold brads
Wednesday, March 26, 2014
Golden friendship
This month my stamp club order included the Watercolor Wonder washi tape, which is a set of three gold colored tapes. It took me a while to decide to order them, because I wasn't sure how much I would use gold. Well, after I sat down with them in front of me, it didn't take long! I'm an old Girl Scout, and one of the songs we used to sing all the time went like this, "Make new friends, but keep the old; one is silver and the other gold." So in my head I always think of really good friends when I see the color gold. Thus, the perfect pairing for that gorgeous gold washi tape was the sentiment from the World Treasures set, complemented with gold embossing powder and some beautiful gold foil sheets, which aren't just for Chrismas! I cut out the sentiment with the Apothecary accents framelits dies, and traced around the outer edge of the die and cut it out by hand to make the gold layer behind it. This card was simple to put together, perfect for a spur-of-the-moment send out to a dear friend. I just ripped the washi tape and put it on there, but if you like a cleaner edge, you could cut the tape and add it on for a more formal look than this casual one-layer card.
Card Supplies: (All supplies from Stampin' Up unless otherwise noted)
Stamps: World treasures
Cardstock: Very vanilla, gold foil
Ink: Versamark
Other Stuff: Gold EP, Apothecary Accents framelits, Watercolor wonder washi tape, dimensionals
Sunday, March 23, 2014
Pretty in Pink
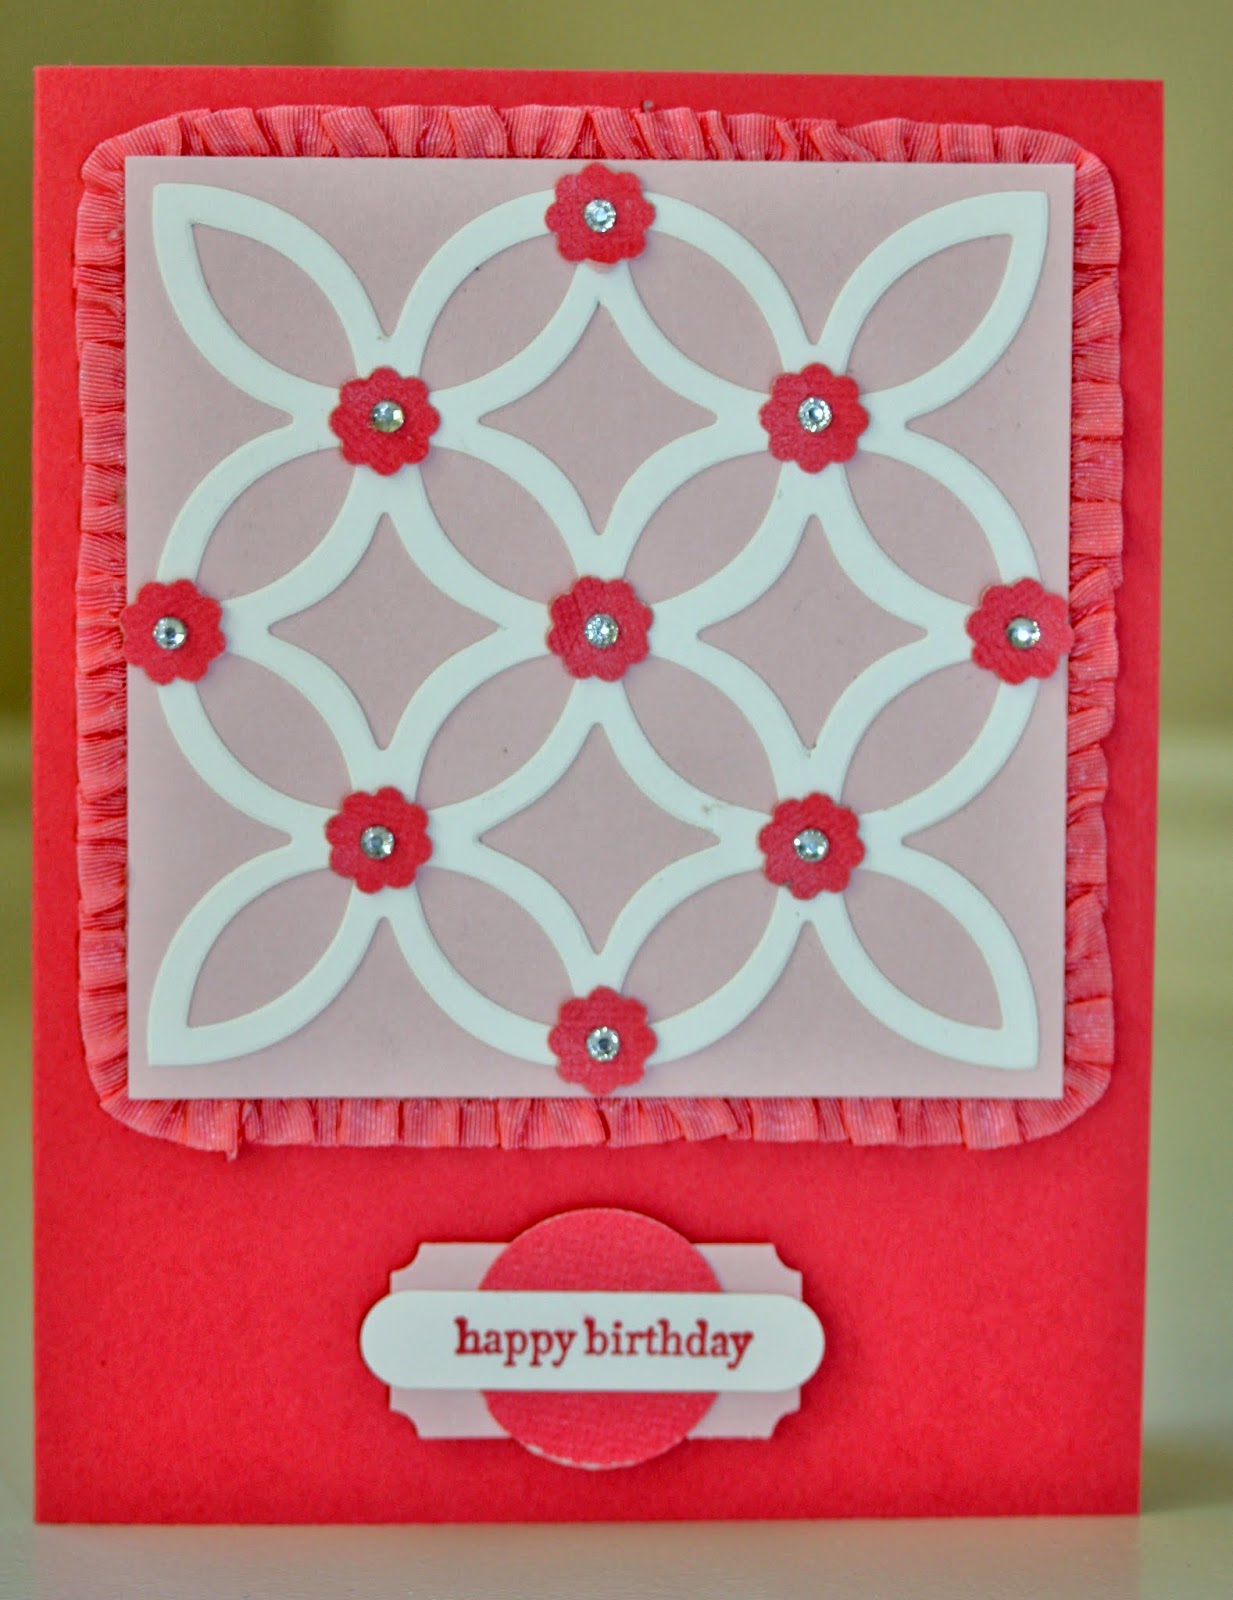
I was finally able to get some pictures of the cards I've been making lately, so I'll have several to share with you this week. This is the card I was talking about last time - my stamp club swap card from last month. Our theme was 'Monochromatic cards' and I got some real beauties from the group. I copied the idea for this card from someone on Splitcoast and I very smartly put the person's name on a sticky note inside the card I was going to keep for myself for the swap, so that I could tell you. However, I must have accidentally swapped that card (not so smart)!!! So, I cannot take credit for putting the little flowers on the lattice, but I can't tell you who gets the credit :-(
Doesn't this card just scream "Springtime"? I'm still waiting for spring to hit my part of the world so as I wait I have to make do with making pretty cards like this.
Card Supplies: (All supplies from Stampin' Up unless otherwise noted)
Stamps: Teeny tiny wishes
Cardstock: Strawberry slush, Pink pirouette, whisper white
Ink: Strawberry slush
Punches: Itty Bitty shapes punch pack, Modern label, 1" circle, Ticket duo builder
Other Stuff: Lattice die, Rhinestones, Strawberry slush ruffle stretch trim, dimensionals
Tuesday, March 18, 2014
Help from a friend
I cannot tell a lie: this was not the card I was planning on posting today. I have another card that I quite love, but I thought I had a picture of it and I don't. And if there is one thing that I learned while I was home recovering from my surgery it is that it is best to take pictures of your cards during the day. They look SO MUCH BETTER than my poor cards that I photographed at night (which is how I always did it because I work during the day and stamp at night). But now that it is almost springtime, I can still get in plenty of good light when I get home from work, as long as I REMEMBER TO DO IT. That is the story of my life right there folks.
Anyway, on to today's card. My stamp club does a monthly swap, which is really fun and it also encourages everyone to actually use the products they buy each month instead of just looking at them, all pretty in their packaging. So, for today's card I decided to use one of the layouts from a swap I got a few months ago. It's simple, but so cute and I got to use several of the designs from the Sweet Sorbet paper pack offered for FREE (with $50 purchase) during Sale-a-bration, which ends this month. And of course I couldn't stay away from my go-to set, Starburst Sayings. What do you think of the Pistachio Pudding paper for the card base? It's not a color I've used often, but I can see it really coming out and using it a lot now that spring is about here. Hopefully I'll get around to snapping that picture of the other card I've made, which is also quite 'Spring-y.' See you soon!
Card Supplies: (All supplies from Stampin' Up unless otherwise noted)
Stamps: Starburst Sayings
Cardstock: Pistachio pudding, Crisp Cantaloupe, Whisper white, Sweet Sorbet DSP
Ink: Versamark
Other Stuff: Pool party EP, Starburst and circles framelits, square punch, Perfect polka dots EF
Friday, March 14, 2014
Trash to treasure
A few days ago I decided to undertake a big project: cleaning off my stamp desk. This is really more of an excavation than just a cleaning, if truth be told. I will work and work at my desk until my stamping area gets to be too small for me to work at anymore; in my case this is less than about a 10" x 10" square, although in a pinch I can work in smaller spaces than that! It is amazing the things that get uncovered as I clean. I find all sorts of bits and pieces of projects that never quite got finished. Most of the time I just pitch them because I want to clean for some new project I have dreamed up, but sometimes I take a second look at it with fresh eyes and come up with something I like. Today's card is an example of that. I had played with the Happy Watercolor stamp set and actual watercolor paper a while back and was underwhelmed. But then when I found my watercolor rainbow, I trimmed it up a bit, added a super-cute sentiment and put it onto the one watercolor wonder designer notecard that I didn't know what to do with. Super simple but I have to say, it makes me very happy!
Card Supplies: (All supplies from Stampin' Up unless otherwise noted)
Stamps: Happy Watercolor
Cardstock: Watercolor paper
Ink: Real red, pumpkin pie, daffodil delight, gumball green, tempting turquoise, basic black
Other Stuff: water spritzer, Watercolor wonder designer note cards, corner rounder punch
Wednesday, March 12, 2014
Many, many thanks
Six weeks ago today I had surgery to remove a large, benign brain tumor. The surgery took almost 7 hours and I was in the hospital for 5 days, and have been home on medical leave this whole time. Amazingly, the surgery and my ensuing recovery went incredibly smoothly, and I am getting ready to return to work tomorrow. Obviously, I could not have done this on my own and have many people to thank. My hospital room, and then my house, looked like a florist shop for weeks (it was quite lovely!). I had meals brought to the house, baked goods dropped off, got 'goody boxes' in the mail and had countless acts of kindness, thoughts, prayers and well wishes sent my way. I have written a lot of thank you notes! Today I am sharing some of the cards I sent. I used a beautiful notecard set from the Stampin' Up! Occasions catalog called Watercolor Wonder Designer Note Cards & Envelopes. They are an amazing, thick watercolor-weight and already have most of the design on them. All I had to do was add a little sentiment and stamping here and there to give them my own little spin, which was perfect because I didn't have much energy those first few weeks of recovery! Between these cards, and the Good As Gold card kit (FREE as a Sale-a-bration kit!), I was able to get all my thanks out!
Monday, March 10, 2014
Two to share
Today I'm sharing two cards that use the same sketch, but look completely different. The first is another fun birthday card using my favorite set from the Occasions catalog, Starburst sayings and the coordinating Starburst framelits. I used a piece of (now retired) tangerine tango DSP from the old Brights color stack (which could easily be substituted for a pattern in the new stack) and then put some fun colors together with it: Coastal Cabana and Tempting Turquoise, pulling them all together by embossing with the oldie but goodie Perfect Polka Dots embossing folder. I used Turquoise embossing powder for the focal point of the sentiment and finished the whole thing off with the Banner punch and stamp set that is part of the Sale-a-bration special that is still good until the end of this month!
My second card was inspired by a baby shower that my sister, mom and I are helping to host in April. It's a little more 'modern' and uses the color scheme of Strawberry slush, Pink Pirouette and Smoky slate. I used copious amounts of the gorgeous Strawberry slush ruffle stretch trim and the elephant from the Zoo babies set (did you see that I popped up the elephant's ear with a dimensional???). Again, I used the Sale-a-bration banner stamp set and punch for a cute little addition at the top of the card. To finish it off, I used the Modern Mosaic embossing folder, although I think that the Chevron EF would have been another great choice.
That's all for now - I've got some more great stuff to share with you later this week. It's Spring Break here in North Texas so I've literally had to fend off half a dozen 'Mom!' calls to post this entry . . . gotta get those kids outside in this beautiful weather to burn off some of that energy I wish I had!
Card Supplies: (All supplies from Stampin' Up unless otherwise noted)
Stamps: Starburst sayings, Banner blast (SAB)
Cardstock: Tangerine tango, Coastal cabana, Tempting Turquoise, Whisper white
Ink: Versamark, Tangerine tango, Coastal cabana, Tempting Turquoise
Other Stuff: Tempting turquoise EP, Perfect polka dots EF, Starburst framelits, Banner punch (SAB), dimensionals
Stamps: Zoo babies, Banner blast (SAB)
Cardstock: Smoky slate, Strawberry slush, Pink pirouette, whisper white
Ink: Smoky slate, Strawberry slush, Pink pirouette
Other Stuff: Strawberry slush ruffle stretch trim, Banner punch (SAB), Stamp-a-ma-jig (for placement of the sentiment), Modern mosaic EF
Thursday, March 6, 2014
A Banner Day - Girly style
About a week ago I posted a really cute birthday card for boys, with nautical colors and the banner stamp and punch from the Sale-a-bration flyer. I thought it was such a cute concept that I decided to change it up a bit and make a feminine version of the same card. The colors I used for the girly version are straight out of what I used for my daughter's nursery, 7 years ago: Light pink, hot pink, and lime green. I LOVE these colors together for girls! AND, this card passed the ultimate litmus test. My daughter saw this card laying on my stamp table, came over, picked it up and studied it for a minute, and then asked me if I could put this card in a special place and save it to give to her on her next birthday! A banner day, indeed!
Card Supplies: (All supplies from Stampin' Up unless otherwise noted)
Stamps: Starburst sayings, Banner blast (SAB)
Cardstock: Pink pirouette, Melon mambo, Wild wasabi, Whisper white
Ink: Pink pirouette, Melon mambo, Wild wasabi, Versamark
Other Stuff: Embossing buddy, Melon mambo embossing powder, Banner punch (SAB), Starburst framelits, glitter pen (non-SU)
Monday, March 3, 2014
A Special Request
My grandmom (we call her Mommom) comes to stay with us for several months at a time throughout the year. Since it is a monstrously awful winter up in Pennsylvania this year, she is having an extended winter stay. Even though she spends so much time here, she makes sure to keep up with what is going on back home. She asked me to make a special 80th birthday card for her sister-in-law, so if Mommom asks, Mommom gets. I even used my special silver foil sheets and silver designer vellum, which I have a tendency to hoard and not use because they are 'fancy.' I don't know if there is a 'color' associated with an 80th birthday (similar to a golden 50th) but I figured an 80th birthday deserved my most fancy schtuff! Although, now it is making me want to get the gold foil and gold designer vellum too!
Card Supplies: (All supplies from Stampin' Up unless otherwise noted)
Stamps: None
Cardstock: Smoky slate, Island indigo, Watercolor Wonder DSP, Fancy Foil Designer Vellum (silver), Silver Foil Sheet
Ink: None
Other Stuff: Typeset Alphabet Bigz Die (for the numbers), Delicate Doilies Sizzlit, Organza ribbon
Friday, February 28, 2014
Working with patterns
Sometimes in a paper pack, there are some prints or patterns that might not appeal to you, even if you like the overall look of the paper pack. For this card, I challenged myself to use a pattern that was difficult for me. This chevron pattern is very bold and not something I would gravitate to on my own, so that's what I decided to try. The trick, I've found, is to use it in small doses. The other thing that I had to do with this card was add some white layers behind the two chevron panels - I had the card laid out without them, but in this case it needed something more, and that extra little layer did the trick. I found this sketch (from Splitcoast, I believe) and it works. This card turned out very neutral; it could be for males or females, old or young. A perfect card to keep in your stash for when you need a quick card!
Card Supplies: (All supplies from Stampin' Up unless otherwise noted)
Stamps: See Ya Later (SAB)
Cardstock: Real red, coastal cabana, Bermuda bay, whisper white, Fresh Prints DSP
Ink: Real red and Bermuda bay markers
Other Stuff: Chevron EF and dimensionals
Wednesday, February 26, 2014
A Banner Day
Today's card was inspired by two things. First, I saw a really cute card on Splitcoast that used banners on the top and bottom (thank you Jennie Maier, who I don't know but I loved her card!). It made me think of flags, so then naturally my mind went to a nautical theme, which always makes me think of the Pottery Barn Kids summer catalogs. I love these catalogs because they have such cute, preppy boys' rooms. I decided to go with Soft Sky, Night of Navy, and Real red as my color theme. From there it came together so quickly and was fun to make - I'm already thinking that I could do one with the same stamp sets in 'girl' colors. This is the kind of card I need to sit down and make a few of, so that I have them when I'm scrambling to get the kids to a birthday party and they say, as we're walking out the door, 'Hey, don't we need a card??' Sometimes it's nice to get back to basics - this card is just stamps and punches, nothing fancy or time consuming.
Card Supplies: (All supplies from Stampin' Up unless otherwise noted)
Stamps: Banner Blast(SAB), Blue Ribbon
Cardstock: Whisper White, Soft Sky, Night of Navy, and Real red
Ink: Night of Navy, Real red
Other Stuff: 1 1/4" and 1 3/8" circle punches, Banner Punch (SAB), Dimensionals
Wednesday, February 19, 2014
Love the Starburst
The Starburst Sayings and Starburst Framelits have got to be, hands down, my favorite things in the Occasions Catalog. I keep reaching for them every time I start to make a card. I always stayed away from card sketches with circles on them, because I never had the "right" stamp set to incorporate into the design. Not anymore!!!! Now I LOOK for sketches with circles just so I can use this set more. Today's card uses a little tip I picked up somewhere along the way and I'll share it with you. The Starburst framelits have lots of space in between the different layers, and sometimes I want a closer layered look (look at the layers on the small circles). The smallest starburst on each of them is from the framelits. The next 'starburst' is home-made by using the 1 1/4" scalloped circle punch. I punched the scalloped circle out, and then stuck it to a sticky note to be able to put it back into the punch and re-punch, this time in the center of each scallop, to give the 'starburst' look. Pretty tricky, huh?
Card Supplies: (All supplies from Stampin' Up unless otherwise noted)
Stamps: Starburst Sayings
Cardstock: Crumb cake, Whisper white, Coastal Cabana, Bermuda Bay, Fresh Prints DSP stack
Ink: Pool party, Bermuda Bay
Other Stuff: Starburst Framelits, Circles Framelits, Dazzling Diamonds, 1 1/4" and 1 3/8" circle punches, 1 1/4" scalloped circle punch, Basic Rhinestone, Dimensional, Coastal Cabana, Bermuda Bay and Crumb cake markers
Friday, February 14, 2014
My blog is back!
Hi everyone!
Yes, it's true. I'm going to start posting on my blog again. Let's do a one sentence recap of the past couple years. Sold house, moved in with mom, built house, moved into new house, had benign brain tumor removed. Sooo . . . I've been kind of busy and have not had much motivation for stamping at all. Now that all the big stuff that I knew was coming up has come and gone, I feel like a weight has been lifted from my shoulders and I have a lot of creativity that's just coming out. Plus, I REALLY like the new stuff in the Stampin'Up! occasions spring catalog and it's helped me get over my creative slump.
So, without further ado, here's my Valentine's Day card, with hardly a minute to spare! I used a sketch to help me get started (that will be a common theme). This one is from the Mojo Monday blog, if I recall correctly. It's my take on a Shabby Chic style and I had a lot of fun putting it together.
I'm still working out some kinks, so expect to see some changes in the future. I'm going to figure out how to watermark my pictures (please don't steal my pictures!), and I have to update all the sidebars and stuff, but I didn't want to wait any longer to start posting, so we'll just fit that stuff in as I can (and as I figure it out!)
Card Supplies: (All supplies from Stampin' Up unless otherwise noted)
Stamps: Hearts a Flutter, Teeny Tiny Wishes, Yippee Skippee
Cardstock: Raspberry ripple, Crumb cake, Primrose petals coredinations, Whisper white
Ink: Raspberry ripple, Crumb cake
Other Stuff: Primrose petals marker (because I can't find the ink pad!), Burlap ribbon (from the Burlap and Blooms Simply Created Wreath Kit), Hearts a Flutter framelits, Scalloped Tag Topper Punch, Raspberry ripple ribbon, Very vintage button, Vintage faceted button, Basic pearls, Chevron Embossing folder, sponge dauber, glitter pen (non-SU), mini stapler (non-SU), dimensionals, Sanding block
Tuesday, March 5, 2013
Thank you notes from my daughter


Hi again everyone! Things as usual are busy in our household. A few weeks ago my lovely daughter turned 6 years old!!! For her birthday, she wanted to go to Chuck E Cheese, and I vetoed that idea (there is only so much a mother can stand, and after more than a few friends' parties that place is on my 'intolerable' list). So for her 'second' choice she wanted to have an art party. We had a wonderful party for her at a studio in downtown Plano for 10 of her closest friends. For the first time, I decided that she needed to write her own thank you notes. She has embraced this idea and has been working on her thank you notes for the past week. She only writes about 2 a night because she spends a lot of time thinking of what to write to individually thank each person. It makes me almost burst with pride to see her sitting there, pencil in hand, writing notes in her kindergarten handwriting. I know that the recipients are going to love the effort she puts into those cards as well.
I had to come up with a card worthy of her efforts, but easy enough to replicate a dozen times. I used the Sale-a-bration set called 'Patterned Occasions' and went with a mostly monochromatic look. I did add a pop of color with the little flower and some of the new striped organdy ribbon from the Spring Catalog. Enjoy!
Card Supplies: (All supplies from Stampin' Up unless otherwise noted)
Stamps: Patterned occasions, Distressed dots background
Cardstock: Whisper white, Pool party or Wisteria wonder
Ink: Pool party or wisteria wonder
Other Stuff: Markers, Basic pearls, Melon mambo striped organdy ribbon, dimensionals, Perfect polka dots EF
Saturday, February 16, 2013
Stampin'Up! Regional Convention


Hi all!!! So today was a big day for Stampin' Up in North Texas. We had a regional convention right here in Dallas. The last time I went to a regional convention was several years ago in Fort Worth when I was a brand new demonstrator, so this was a big treat for me. I even got to meet Shelli Gardner, the founder and CEO of the company!!!!! It was very exciting. One of the big things to do at conventions is to swap cards with other stampers. That way, you get new ideas and share your best (but highly reproducible) work. I made two different designs that I swapped, and everyone seemed to like them so I thought I'd share with you as well. Sorry for the bad pictures, I am NOT a photographer!!!!
I'm tired tonight after all my excitement, so I'll have to tell you about all the stuff in the cards later. For now, just enjoy the pictures :-)
Enjoy!
Thursday, January 17, 2013
Hi everyone!!!
I'm still around, just busier than ever! Here are some of the cards I promised you that will be available at my Birthday Bash event on February 9.
Just $15 holds your seat at the event, allows you to make your first 5 cards, and gets you the awesome Print Poetry Paper Stack from the new Occasions Mini catalog!!!! You can make as many more cards as you'd like for just $1 a card!!!!
Here are the details:
-Saturday, February 9 from 12-5 PM at my house in Plano
-BYOA: Bring your own adhesive. I will have SNAIL for sale in case you forget yours.
-There will be cards for everyone on your list: men, women, teens, kids. This is a great event to stock your box for the next year!!!
-These cards are designed to be 'mailable' and suitable for any skill level.
-Please RSVP to me by no later than February 1 so I can save your space and order your Paper Stack!!! Spaces are already starting to fill up so make your plans now!!!
Feel free to call or email me if you have any questions.
Thanks and Happy Stampin'!
Tuesday, October 2, 2012
Fun thank you
I have to say this right away: I totally CASE'd this card from someone on Splitcoast stampers called Eured99. I don't usually show cards that I totally copy since it is not my idea, but this card is so stinkin' cute I felt the need to show it to a new audience. I made about 18 of these cards as thank you's for my son's birthday. I wrote out the notes but my son (who just turned 4) wrote his name in each one. I am so proud of him for that - he usually doesn't like to do 'schoolwork' but he sat down (in 2 sessions) and wrote his name with no complaints. Gotta start those kids early on the thank you notes!! My children are VERY fortunate and I am working hard to let them know that from an early age. It's very easy to just give in to them and not listen to the whining and crying but, just as my parents did with me, I make a conscious effort to sometimes just say no. And not just say no, but tell them WHY they can't have every toy in the store or candy in the checkout aisle. I'm hoping that eventually my message will sink in. Although, at 4 and 5 years old, we are not there . . . yet. But at least they write thank you notes. It's a good start, right???
Card Supplies: (All supplies from Stampin' Up unless otherwise noted)
Stamps: I dig you, Teeny tiny wishes
Cardstock: Gumball green, Midnight muse, Pumpkin pie, Whisper white
Ink: Gumball green, Midnight muse, Pumpkin pie, Daffodil delight, Basic black
Other Stuff: 3/4" circle punch, Word window punch, Gumball green, midnight muse and pumpkin pie ribbon, stamp-a-ma-jig
Friday, September 21, 2012
Figured it out
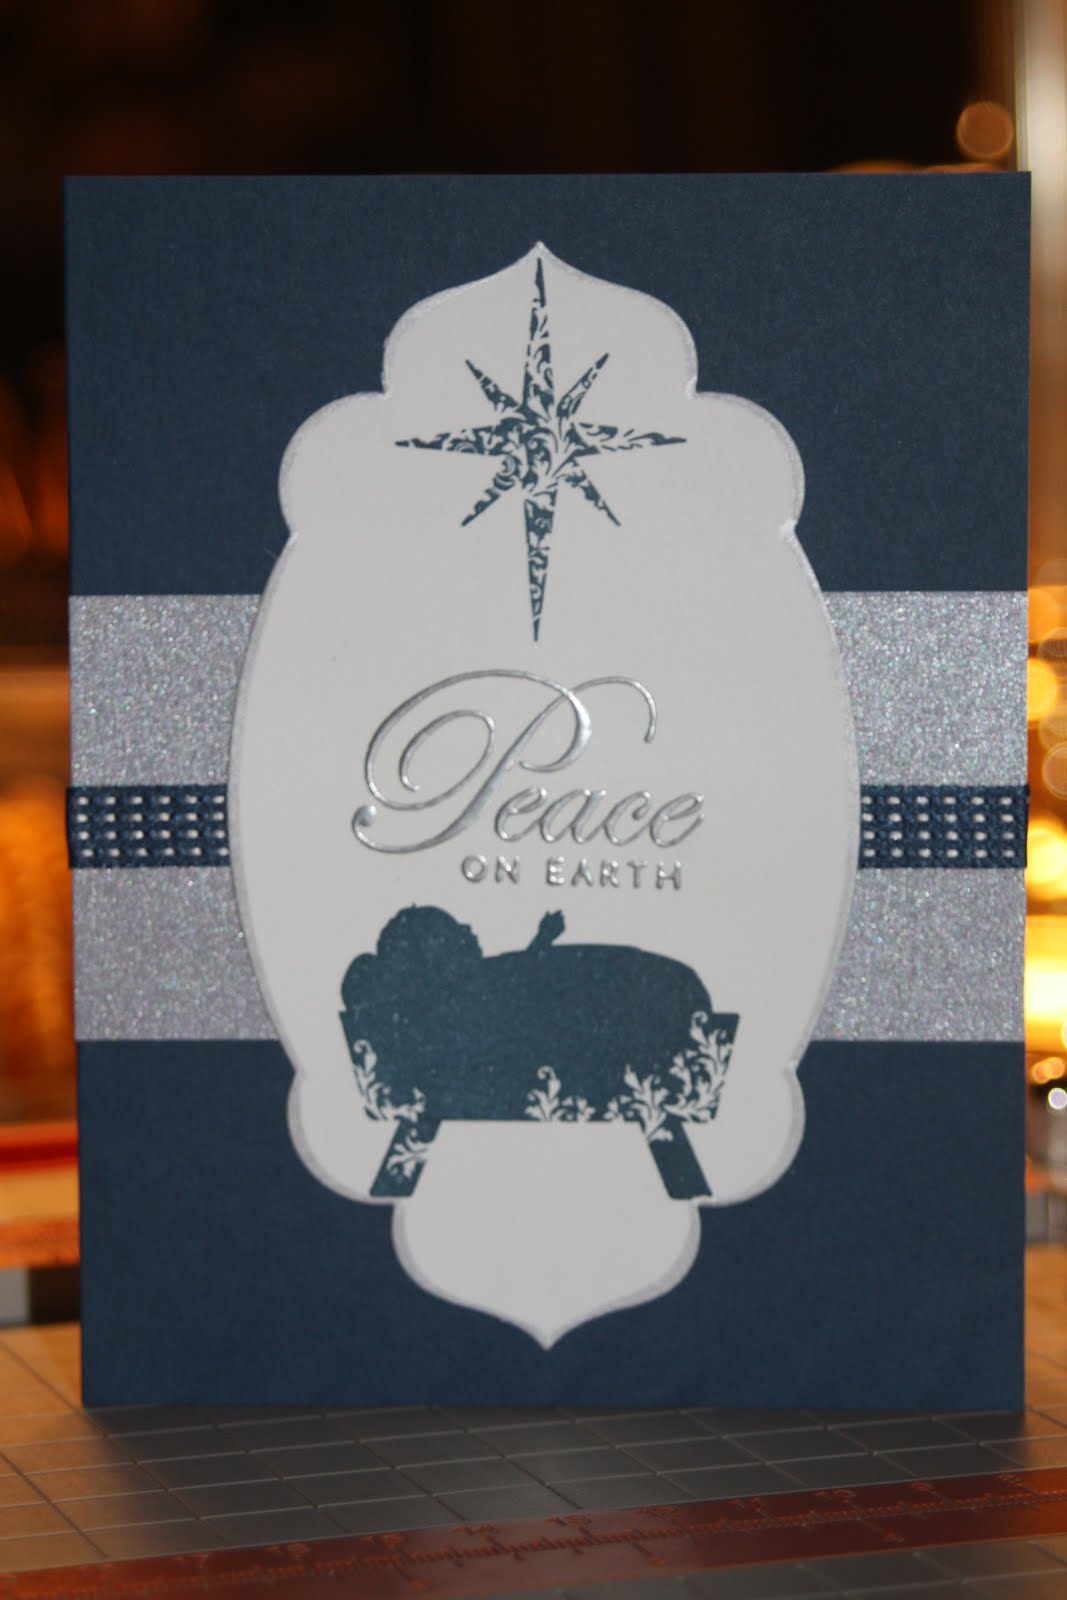
As promised, here's the card that I had such problems with earlier this week. I normally don't make religous Christmas cards, since I send cards to such an eclectic group of people. But since I've started making so many different cards, and this stamp set was so awesome that someone bought it twice and it was just sitting there on my desk, staring at me, I decided to go for it. I had this vision in my head and started cutting away, but then I worked and worked on it and had this huge blank space in the middle. I got frustrated and had to put it aside for a few days (see my previous post for the card I made in the interim). When I picked it back up, I tried a couple different things and bounced some ideas off my mom (LOVE having her sit across from me when I am creating now!). This is the final design that we came up with. Simple, but very beautiful while still keeping the focus on the message of this card.
Card Supplies: (All supplies from Stampin' Up unless otherwise noted)
Stamps: First Christmas, Greetings of the Season
Cardstock: Midnight muse, Whisper white, Brushed silver
Ink: Midnight muse, Versamark
Other Stuff: Apothecary accents framelits, Midnight muse ribbon, Silver embossing powder, Silver stampin dazzle marker
Wednesday, September 19, 2012
A happy accident
Lately I have been riding a wave of creativity and everything that I'm doing is turning out at least something like the vision in my head. I've been hard at work on my holiday cards and had this idea for a card using a set that one of my ladies, well, she liked it so much she bought it twice. Of course I look at that as an opportunity to buy a stamp set that maybe I wouldn't have bought without some encouragement (send it back - what???? - no way!). So I had this great idea in my head and started cutting out 12 shapes for the main image and - oh no! - the execution of the card was not matching my vision AFTER I cut out TWELVE shapes. So after I tried to do what I wanted to do with both sides of the shape I decided to go down a different path. I set aside my new stamp set and desperately tried to find something that would fit in that shape - out popped the beautiful tree from Christmas Lodge. So I decided to go with a rustic, preppy look. Something 'lodge-y' but more preppy than really cowboy, actual rustic (thus more like me). I pulled out some Christmas paper from last year that I hoarded (why do I do that????) and wrapped some cherry cobbler twine around the whole thing and voila . . . my rustic, preppy Christmas card, perfect for the single men on your Christmas card list that do not want glitz and bling. Oh, and just because it's that kind of period for me, after a day or so I went back to the first idea in my head and got it to work. I'll share that one next time!
Card Supplies: (All supplies from Stampin' Up unless otherwise noted)
Stamps: Christmas Lodge, Greetings of the Season
Cardstock: Cherry cobbler, Whisper white, Frostwood Lodge DSP (retired)
Ink: Garden green, cherry cobbler, Versamark
Other Stuff: Cherry cobbler embossing powder, Cherry cobbler baker's twine, dimensionals, Apothecary accents framelit, sponge dauber
Thursday, September 13, 2012
Hard at work
I LOVE that the new Stampin' Up! Holiday catalog came out in August this year. It gives me an extra month to get my stuff together and get working on my holiday cards. I'm not one to brag . . . well, actually, I am. It is September 13th and I have FIFTY (50!) Christmas cards completed already (okay, bragging complete). Since there are so many stamp sets out there and so many different designs, I've shifted from making 100+ of the same design to making 10-12 of a bunch of different cards. In the past, I've had the intention of writing down who gets what card so that I can safely send similar, if not duplicate, cards out from year to year. Of course, I've always been frantically finishing my cards in years past in the second (or third!) week of December so you can imagine where my good intentions ended up. So now I'll be periodically showing you some of my Christmas cards for this year - just don't get mad if you already 'saw' the one you get later this year!
Today's card started out as an idea in my head and then as I was browsing some websites, I came across one that almost matched the image in my head, so I'm going to give a shout out to Stampinnerd's blog for having a great mind that thought like me :-)
I've been trying to figure out how to use the absolutely gorgeous Champagne glitter paper (just those words sound beautiful to me) on a Christmas card so I decided to go with a vintage type feel with neutrals and a muted red (Riding Hood red). I used a shape from the Apothecary Accents framelits collection for the Believe sentiment, and then traced around the outside of the framelit on the glitter paper to make the mat. A little extra work, yes, but oh so beautiful!!!!!
Card Supplies: (All supplies from Stampin' Up unless otherwise noted)
Stamps: Snowflake Soiree
Cardstock: Riding hood red, Very vanilla, Champagne glitter paper
Ink: Crumb cake, Soft suede
Other Stuff: Apothecary accents framelits, dimensionals, Riding hood red pleated satin ribbon (retired), Champagne shimmer paint mist
Subscribe to:
Posts (Atom)